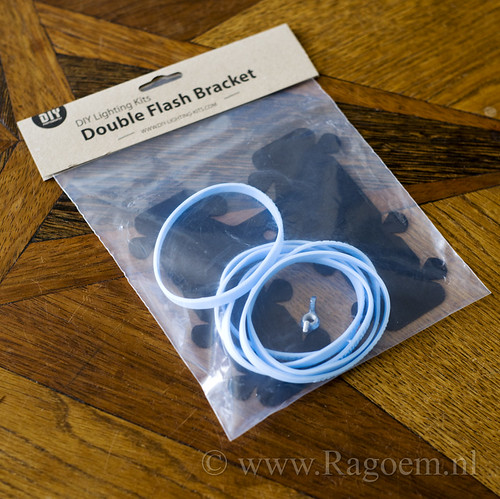
Saturday, April 23, 2011

Life

Life by Ragoem
Life, a photo by Ragoem on Flickr.
The idea for this photo came to me a few days ago. Saw a photo of a box of five eggs and a drumstick. Thought I would do it differend, at first I wanted to do 2 eggs, 2 drumsticks and 2 bones. But later on I thought it would be better to use 2 chicks and leave the bones.

But there was a problem, I couldn't get my hands on 2 life chicks and went for some fake chicks, whome I could get everywere because it's almost easter.

For the background I used some jute and over that some straw on which I placed the egg-box with the eggs, chicks and drumsticks. Placed a Minolta 5400HS with a 4.5cm DIY straw grid direcly overhead. Tada, thats it.

Thursday, April 21, 2011

How I did: Color Cubes RGB and CMYK

RGB by Ragoem
RGB, a photo by Ragoem on Flickr.

CMYK by Ragoem
CMYK, a photo by Ragoem on Flickr.

I'm getting several questions by mail lately on how I did these photo's of Melanie (RGB) and Annemijn (CMYK).

The whole idea behind this was: make for both color systems cubes and put the same model into al four cubes. Forming one big cube. Rinse and repeat for the other color-system.

Groen, a photo by Ragoem on Flickr.
Groen by Ragoem
I already had done a serie with colored cubes, "Groen" on the right is one of the photo's out of this serie. But if I wanted to use the cubes from this serie I had one big problem; the six cubes are made out of cloth in six differerend colors and than hung in a frame. So they are not square. And only the floor is hard, so the model couldn't lean against the walls of the cube.

To make more use for other shoots of the cubes, we did not want to make them very small, but as big as possible. So we had to search for tall models and we found a tall one (1.85mtr) at the local supermarket, and she had an even taller friend who also wanted to model for me.
We made the cube (yes, made only one) to fit Annemijn in the way I wanted. Meaning she could just get her leg straight in the cube. Now the problem was what to do with the colors, make one or more cubes, paint them the right color, make some sort of covers for the cubes. What was practical and even more important, how much would it cost. We decided on one cube (110x110x110cm) made out of 8 or 12 mm plywood and a pine frame on the back to make it stiff and to clamp the five pieces together. First we wanted to paint the cube but that would main one shoot, paint, a week later next shoot, etc, etc. this would make atleast eight weeks work sanding and painting and at the end one color cube. So my dear wife offered to make me 40 (8 colors with 5 panels) covers which would fit all five panels. So we could do two colors in one day and a whole serie in two saturdays. So all eight color were done in four saturdays.

After the photo-shoots where done, we made several sets of cubes with differend themes.
They were merged together in to photoshop to form the end cube, where I also made the colors more RGB/CMYK.

Two of the results can be seen above.

Sunday, April 17, 2011

Review: DIY Ring Flash

The ring flash from DIY Lighting Kits comes as a kit (of course).

It's very easy to assemble even our 9 year old neighbor boy who doesn't speak english, could see how to put the kit together.
The inside is cardboard with silver print and the outside is soft plastic.
It's done in a few minutes.(by me, not my next door neighbor boy)
To put my Minolta 5400HS into the ring flash, I had to make some cut's in the corners as discribed in the manual.

My first impression: Good, it looks and feels solid.

The next thing to do is bend the bracket for the flash. Now there are marking where to bend the bracket in the manual, only not for Sony. So out comes the tapeline to see where i should bend it for my A900 w/ grip.
Only to find out the bracket wil only fit without my grip on the camera (the bend and the holes for the bracket can not be in the same spot). So I go for option two in the manual; tape the flash to the ringflash.

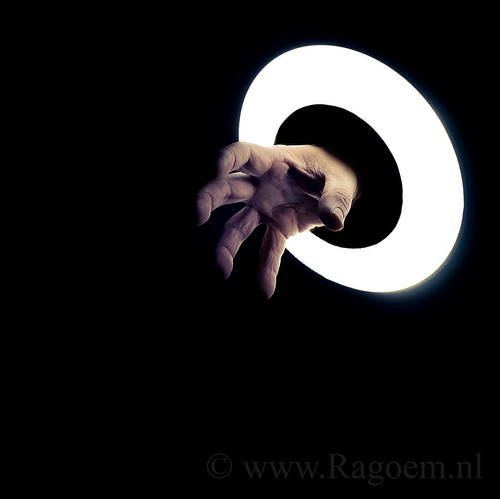
First to test the light output compaired with my Orbis ring flash.
At first no surprise to me, the orbis in comparison with the DIY has a higher output at 1/1 an a zoom of 105mm with a 5400HS, but what if a change the zoom for the DIY (for the orbis they advice is: max zoom) to 24mm. Surprise the DIY has a slightly higher output. See picture below.
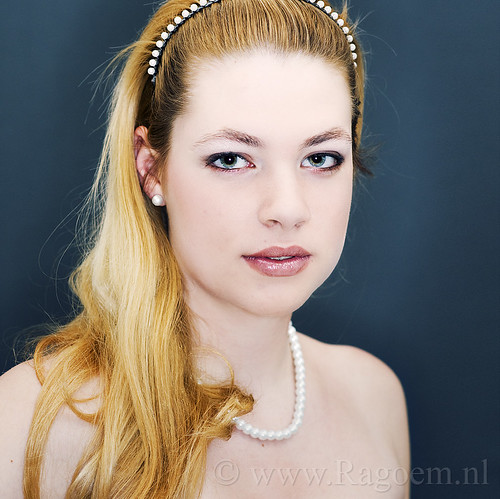
As comparison I shot three photo's of Linsey one with the Orbis, DIY and my FE4M Ring flash:

Straight out of camera
1. Orbis @ 400ISO f4.5
2. DIY @ 400ISO f4.5
3. FE-4M 100ISO f9.0

Oke, the FE-4M has a lot more output (it was set at min. power), but its a 400Ws flash.
But compaired with the orbis there is not much difference.
Yes the orbis is more rigide and durable but it will set you back about 150euro.
As for the DIY ring flash it will set you back only 25.95 USD.
If you use a ring flash on location a lot, the DIY ring flash may not be durable enough, it's not made to travel (it's made of cardboard and flexable plastics so you can't stuff it into you bag).
But if you shoot around the house/studio and occasionally on location, or are a bit carefull with it when you travel it's a great alternative. (and a lot cheaper)

Will be editing some photos of the shoot I did with Linsey. Put them one later this week.

Here is the first one:
Linsey (DIY-Ring Flash test) by Ragoem
Linsey (DIY-Ring Flash test), a photo by Ragoem on Flickr.

Saturday, April 16, 2011

I'm gone get you........

I'm gone get you........ by Ragoem
I'm gone get you........, a photo by Ragoem on Flickr.
Shot for Daily Shoot: Make A photograph that features you in some way.

While working on a review for a DIY ring Fash I came up with this.
(for those who want to know, review will come online tomorrow)

Made the photo by setting the flash w/ DIY Ring Flash on the table, the camera on a tripod and sticking my hand trough the ring flash.
Added some blue in the shadows.
Made the inner ring black and made the ring-flash bright white.

Lighting: 5400HS-1/4-105mm in DIY Ring Flash trigged by Cactus V4.

Friday, April 15, 2011

Linsey (with fader ND)

Linsey by Ragoem
Linsey, a photo by Ragoem on Flickr.

Last week we  did a photoshoot with Linsey.
I wanted to try my Fader ND mkII to get less depth of view with direct sunlight.
The goal was to get the aperture to f5.6 with the 85mm/1.4 lens I use.
But I also want my flash not harder than 1/4 power to get a decant recycle time out of the LP160.
So I set the ND filter @50% and used 2 LP160 @ 1/4 on a Double flash bracket and the shutter time @ 1/60s to get the lighting the way I wanted.
The only thing I did not have control over was the wind, because of that I couldn't use the umbrella I had with me to soften the light the way I wanted.


Thursday, April 7, 2011

Review: Double Flash Bracket

The Double Flash Bracket from DIY Lighting Kits came in the mail.
Double flash bracket by Ragoem
Double flash bracket, a photo by Ragoem on Flickr.

It looks very simple, which I like.
In the package are a metal plate (the bracket), 6 rubber band to hold your flash on the bracket and a wingnut to attach the plate to the lightstand.

To set it up, you put the bracket on the spigot of your lightstand and secure it with the wing nut.


Put the flashes on the bracket with the surplied rubberbands. And your ready to go.
What do I think of it? I think it's a great product, it's small, it's simple, it works. What more do you want from a DIY based product. The rubberband feel a bit stiff but I like that because they will keep my flashes on the bracket. Tried to shake my flash of by holding it on the bracket with the flash on the underside while shaking it, the flash did not move even when attached with only two of the three rubberbands, so with all three rubber bands attached it will not move on the bracket. The placement is low this is great for use with silver-umbrellas, now the flashes are in the middle of the umbrella and the light will get straight out the umbrella and not at an angle.
What's more to say? They will set you back 19.95 (USD).
Is it a fair price? Yes.
Can you make a cheaper one your self? Yes, did it myself, but had to weld some pieces, and not every one has a welder. And you need two extra spigots (which I have, but if you don't they will set you back about €7.00 a piece, making it with the bracket material more expensive)

Final Verdict: It's a good, simple product. It does it's job very well, and that's what counts.

You can get yours here: DIY Lighting Kits

Still to come:
Review of the DIY Lighting Kits - RingFlash